
보라코딩
Vue, 스프링부트 REST API (2) 본문
DB 연동하고 JPA로 조회하고
vue 화면 꾸미기 (DB 데이터 받아오고, lib 사용)
DB연동
IntelliJ에서 MariaDB 연동
오른쪽에 database 클릭해서 다운받고 연동
인텔리제이에서 마리아db 연동하고
테이블 생성하고 column 생성하고
데이터도 넣고 다 된다!


JPA로 데이터 조회
build.gradle
dependencies에 내용 추가
dependencies {
    implementation 'org.springframework.boot:spring-boot-starter-web'
    testImplementation 'org.springframework.boot:spring-boot-starter-test'

    implementation 'org.springframework.boot:spring-boot-starter-data-jpa'
    runtimeOnly 'org.mariadb.jdbc:mariadb-java-client'
    compileOnly 'org.projectlombok:lombok'
    annotationProcessor 'org.projectlombok:lombok'
}
아래와 같은 구조로 작성
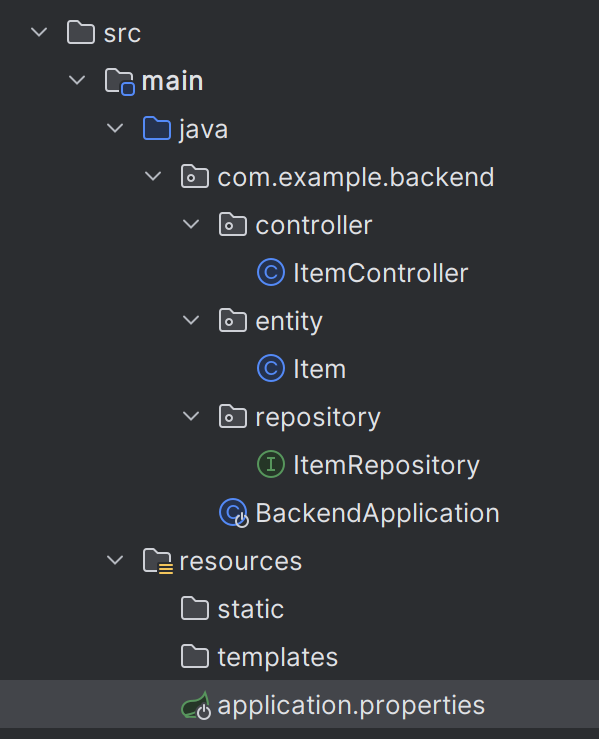
Item
package com.example.backend.entity;

import lombok.Getter;

import javax.persistence.*;

@Table(name="items")
@Entity
@Getter
public class Item {

    @Id
    @GeneratedValue(strategy = GenerationType.IDENTITY) //자동증가
    private int id;

    @Column(length = 50, nullable = false)
    private String name;

}
ItemRepository
package com.example.backend.repository;

import com.example.backend.entity.Item;
import org.springframework.data.jpa.repository.JpaRepository;

public interface ItemRepository extends JpaRepository<Item, Integer> {
}
ItemController
package com.example.backend.controller;

import com.example.backend.entity.Item;
import com.example.backend.repository.ItemRepository;
import org.springframework.beans.factory.annotation.Autowired;
import org.springframework.web.bind.annotation.CrossOrigin;
import org.springframework.web.bind.annotation.GetMapping;
import org.springframework.web.bind.annotation.RestController;

import java.util.ArrayList;
import java.util.List;

@RestController
@CrossOrigin("http://localhost:3001/")
public class ItemController {

    @Autowired
    ItemRepository itemRepository;

    @GetMapping("/api/items")
    public List<Item> getItems(){

        List<Item> items = itemRepository.findAll();

        return items;
    }
}
application.properties
spring.datasource.driver-class-name=org.mariadb.jdbc.Driver
spring.datasource.url=jdbc:mariadb://localhost:3306/gallery
spring.datasource.username=root
spring.datasource.password=비밀번호!!

vue로 화면 꾸미기
속성 앞에 : 붙이기
<span class="img" :style="{backgroundImage: `url(${item.imgPath})`}"/>
인텔리제이에서 button.btn.btn-primary 하고 바로 tab 누르면
<button class="btn btn-primary"></button>
lib.js
export default {
    getNumberFormatted(val){
        return val.toString().replace(/\B(?=(\d{3})+(?!\d))/g, ",");
    }
}
Card.vue
setup() {
  return {lib}
}
setup에 입력해서 import 해오면 아래와 같이 사용할 수 있다 (쉼표 기능)
{{ lib.getNumberFormatted(item.price) }}원

Card.vue
<template>
<div class="card shadow-sm">
<span class="img" :style="{backgroundImage: `url(${item.imgPath})`}"/>
<!-- <img :src="item.imgPath">-->
<div class="card-body">
<p class="card-text">
<span>{{ item.name }} </span>
<small class="discount badge bg-danger">
{{ item.discountPer }}%
</small>
</p>
<div class="d-flex justify-content-between align-items-center">
<button class="btn btn-primary">구입하기</button>
<small class="price text-muted">
{{ lib.getNumberFormatted(item.price) }}원
</small>
<small class="real text-danger">
{{ lib.getNumberFormatted(item.price - (item.price * item.discountPer / 100)) }}원
</small>
</div>
</div>
</div>
</template>
<script>
import lib from "@/scripts/lib";
export default {
name: "Card",
props: {
item: Object
},
setup() {
return {lib}
}
}
</script>
<style scoped>
.card .img {
width: 100%;
display: inline-block;
height: 300px;
background-size: cover;
background-position: center;
}
.card .card-body .price {
text-decoration: line-through;
}
</style>'코딩 > Vue' 카테고리의 다른 글
| Vue, 스프링부트 REST API (3) (0) | 2023.09.16 |
|---|---|
| Vue, 스프링부트 REST API (1) (0) | 2023.09.10 |
| vue 설치 및 기초 (0) | 2023.08.29 |
'코딩/Vue' Related Articles
more

